For a young and enthusiastic musician, there’s probably no better feeling than building your own recording studio or rehearsal space.
But whatever your intentions are, studio space or rehearsal hall, there are guidelines you’ll need to follow if you want the best possible acoustics for your space.
That’s why we decided to do this brief guide on how to improve room acoustics.
Step 1 – Look at the bigger picture
The very first thing you need to do is look at the room where you’re planning to build a studio. You need to look at its shape, size, and corners.
According to the overall shape, you’ll be finding perfect spots for your computer and studio monitors, and where you’ll set up microphones and different places to record instruments and vocals.
Of course, most of the rooms in average homes are far from perfect for recording or rehearsal purposes. However, it is possible to make some adjustments and improve their acoustics.
Small rooms with the ideal square shapes are probably the worst option, but even these can be turned into decent home studios.
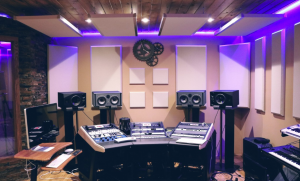
If your room is a rectangular shape, it would be best to have your work desk and monitors sitting at one of the short walls.
Your seating position should be facing the short wall where the desk and the monitors are located. The other end of your room should be used as a “live end,” a place where you’ll be recording all the live instruments.
Basic adjustments and positioning
 The next thing you want to do is to remove all of the hard reflective surfaces from your room.
If there’s something you can’t (or won’t) remove, there are ways that you can dampen the reflected sound. But the parts of the room where you intend to put your work surface and recording equipment needs to be completely cleared out.
Of course, all of this is easier if you’re planning to use one room entirely for recording and/or rehearsal purposes. You have a whole room solely for your music.
Some engineers hold onto the so-called “38 percent rule” where the engineer should sit about 38 percent from the wall in front of them. If for some reason you can’t use the room this way, make sure not to place the sitting area with a wall right behind your back.
When it comes to positioning monitors, they must be positioned at the same distance from where you’re sitting. A perfect triangle should be your goal with two points being the monitors and the third point sitting somewhere right behind your head.
Absorbers and diffusers
 Since the sound is bouncing freely all over your walls, you’ll need to be thinking of absorbers and diffusers and how you’ll arrange them around your designated studio room.
Absorbers are panels made of softer foam-like materials, like rock wool, which will prevent further dispersion of the sound. They basically “deafen” the room.
However, it needs to be pointed out that it’s not a good idea to have absorbers of the same shape, size, and thickness at every location.
Most of them should be made in different dimensions and placed around the room accordingly. What you want to achieve here is to deal with all the mid and high-range frequency reflections.
As for their positioning, place absorbers behind your work desk and monitors and on the walls left and right from where you’re sitting. Try to use absorbers of different sizes but make the overall distribution as symmetric as possible.
For example, use the same type of absorbers left and right of you, and then place different types of absorbers on the wall behind the monitors.
In case you have windows and other hard objects, like heating radiators, which you can’t take out of the room, find the best way to dampen them.
For home recording purposes, a thicker curtain will do the trick for windows.
As for heating radiators and hard metal surfaces, you can either have foam dampeners placed over them or can even build special wooden “cases” around them which will act like diffusers.
While we’re at diffusers, their purpose is to reflect the sound waves in multiple directions and prevent them from going directly to the position where you’re sitting.
They scatter all the problematic frequencies so that you can get a flat frequency response.
Diffusers are made from harder materials, mostly wood, and feature multiple smaller surfaces at uneven levels.
These are usually smaller panels filled with wooden prisms of unequal length. If you want to save some money, you can make them on your own as there are plenty of schemes and tutorials online.
Diffuser panels are usually placed on the wall opposite to your monitors.
Also, all the potential furniture you’re planning to have in your room, like chairs or sofas, should be covered with softer material.
It’s not recommended to have any hard surface chairs or anything similar as it will just mess with your acoustics.
This is also the reason why you should buy some of those studio or office chairs which are covered by softer materials.
Corners
All the corners in your room increase the unwanted reflection of all the lower-end frequencies. For this purpose, you’ll need to use the so-called “bass traps” which are essentially absorbers which “cut” the right angles of your rooms.
Bass traps are designed to fit perfectly in corners with their backsides and to have a flat surface at the front. They don’t take up entire corners from the floor to the ceiling but only a portion.
Setting up monitor speakers
As we already mentioned, two studio monitors and the point right behind your head should form a perfect equilateral triangle.
However, in ideal situations, monitors themselves should be placed on separate stands with their tweeters sitting at the height of your ears.
Some of these specialised monitor stands can be filled with materials like sand to absorb all the vibrations.
The monitors themselves should also not be put directly onto hard surfaces, but on softer materials like rubber.
What you also need to pay attention to is for both of them to be placed on the same type of material. After all, you want everything to be as symmetrical as possible in order to get the perfect audio picture.